Overview of FlashAir for iOS app development
Latest update: July 2013
Prior Knowledge Required
Communication with the FlashAir is done via CGI commands using HTTP communication. Therefore, you only need to understand the behavior of CGI commands and how to communicate via HTTP in order to create simple applications.
In this tutorial, we will make basic sample applications and will describe the behavior of each CGI command used.
When you have finished the tutorial, please suggest more apps and interesting uses of FlashAir.
Preparation
1. Set Up iOS Development Environment
For general purposes, iOS app development requires Xcode and a Mac. Optionally, if you would like to test the iOS applications on an actual device or publish in the AppStore, you will need an Apple Developer License.
For more information, please visit the Apple website .
2. Getting FlashAir
In order to test your app, you will need to acquire a FlashAir device. The Toshiba FlashAir is available both online and in electronics stores.
3. Supplemental Information
- Using Station Mode
- By default, the FlashAir works as a Wireless LAN Access Point (Infrastructure Mode). This means that while your machine is connected to the FlashAir, you won't be able to access Internet via Wireless LAN. However, if you have another Wireless LAN Access Point, FlashAir can work as a Wireless LAN Client (Station Mode). If you connect the FlashAir to a common Wireless LAN Access Point with your development environment, you can access both the FlashAir and Internet simultaneously. Please refer to Advanced Tutorial #1: Station Mode for more details.
- Longer Timeout
- FlashAir stop its Wireless LAN functionality to save the power consumption if no communication through Wireless LAN for some while. It is usual case in development phase. You can change the timeout length to stop Wireless LAN.
Please refer to CONFIG Reference: Set connection time-out period for more details.
Creating an iOS Project
In this section, we will show you how to make a new project, which is the necessary first step in iOS App development.
1. Create a new project
Select "File" → "New" → "Project" in the menu.
2. Configure the Project
We will show you the configuration we use in the tutorials, which will ensure that your sample applications are consistent with our examples. Ultimately, you can configure your project however you want.
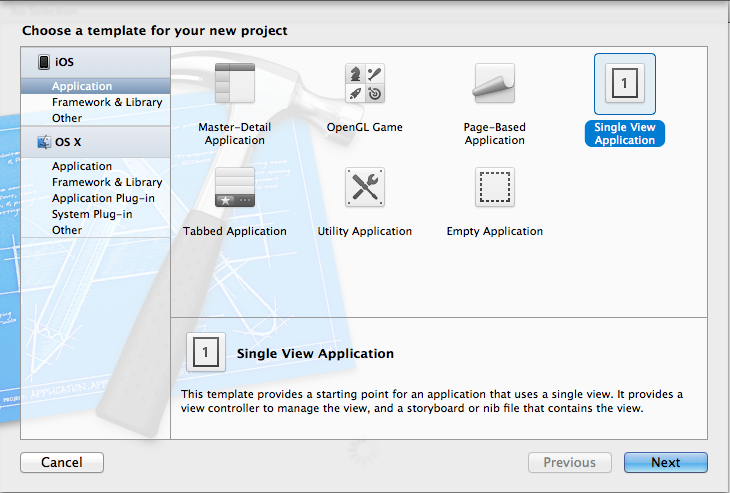
- On the choose template screen, please choose "Single View Application", then press "Next".

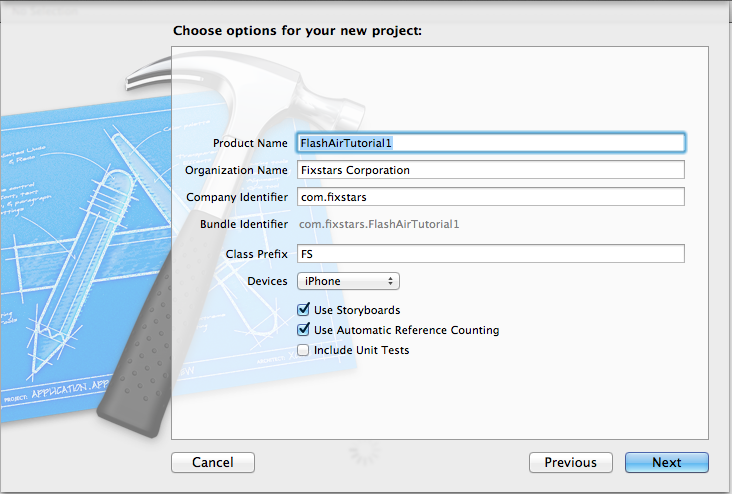
Now you will see an options screen for your new project. Choose a project name. We use
"FlashAirTutorial" followed
by the tutorial number (ex. "1") as our naming scheme.
We will not select the 'Include Unit Tests' options. Other than this, we will use the default
settings. Press
"Next" to go to the next configuration window.

Select the folder where you want to create the project and press 'Create'.
Source code for a simple iOS app using Storyboards is automatically generated.
Each subsequent tutorial will start at this state.
 FlashAir™ Developers